The next step is to fix the menu so that it will display the options dynamically. We open the Page template so that we will be able to edit it.

Right now we have a static menu which has the following contents.
<nav id="Menu">
    <a href="/en/home">Home</a>
    <a href="/en/company">Company</a>
</nav>
In order to make it dynamic, we have to find the root node of the current language tree. In the coded block we add the following line of code which will give us this information.
var LanguagePage = CurrentPage.AncestorsOrSelf().Last();In this line of code we get all the ancestors of the current page and we get the last one which is the language node. The entire code block becomes like the one below.
@{
    Layout = null;

    var LanguagePage = CurrentPage.AncestorsOrSelf().Last();

    string CurrentUrl = CurrentPage.Url;
    string EnglishUrl = "/en" + CurrentUrl.Substring(3);
    string GreekUrl = "/gr" + CurrentUrl.Substring(3);
}
The next step is to replace the nav element with the one below.
<nav id="Menu">
@foreach (var MenuItem in LanguagePage.Children.Where("Visible"))
{
    <a href="@MenuItem.Url">@MenuItem.Name</a>
}
</nav>
We get all the children pages of the language page and we generate a list of links.
The entire template code has the following contents now.
@inherits Umbraco.Web.Mvc.UmbracoTemplatePage
@{
    Layout = null;

    var LanguagePage = CurrentPage.AncestorsOrSelf().Last();

    string CurrentUrl = CurrentPage.Url;
    string EnglishUrl = "/en" + CurrentUrl.Substring(3);
    string GreekUrl = "/gr" + CurrentUrl.Substring(3);
}

<!DOCTYPE html>
<html xmlns="http://www.w3.org/1999/xhtml">
<head>
    <title>@Umbraco.Field("title")</title>
    <meta name="description" content="@Umbraco.Field("description")">
    <meta name="keywords" content="@Umbraco.Field("keywords")">
	<link href="/css/Stylesheet.css" rel="stylesheet" />
</head>
<body>
    <div id="Container">
        <div>
            <nav id="Menu">
            @foreach (var MenuItem in LanguagePage.Children.Where("Visible"))
            {
                <a href="@MenuItem.Url">@MenuItem.Name</a>
            }
            </nav>
            <nav id="Lanugages">
                <a href="@GreekUrl">Greek</a>
                <a href="@EnglishUrl">English</a>
            </nav>
        </div>
        <div id="Body">
            @Umbraco.Field("pageText")
        </div>
        <div id="Footer">
            Sample multilanguage site
        </div>
    </div>
</body>
</html>
Now we can use the menu and the language selector and everything works fine. We still have a problem with the menu. The links work as they supposed to work but the texts for each menu option remains in English. A lot of people just add a new property for the Page Document Type which will contain the word or phrase that we want to appear on the menu. This is an option which will work but I do not like it because I want the name of each page to appear at this place. This is the actual information that we use in all web sites which does not require Multilanguage contents.
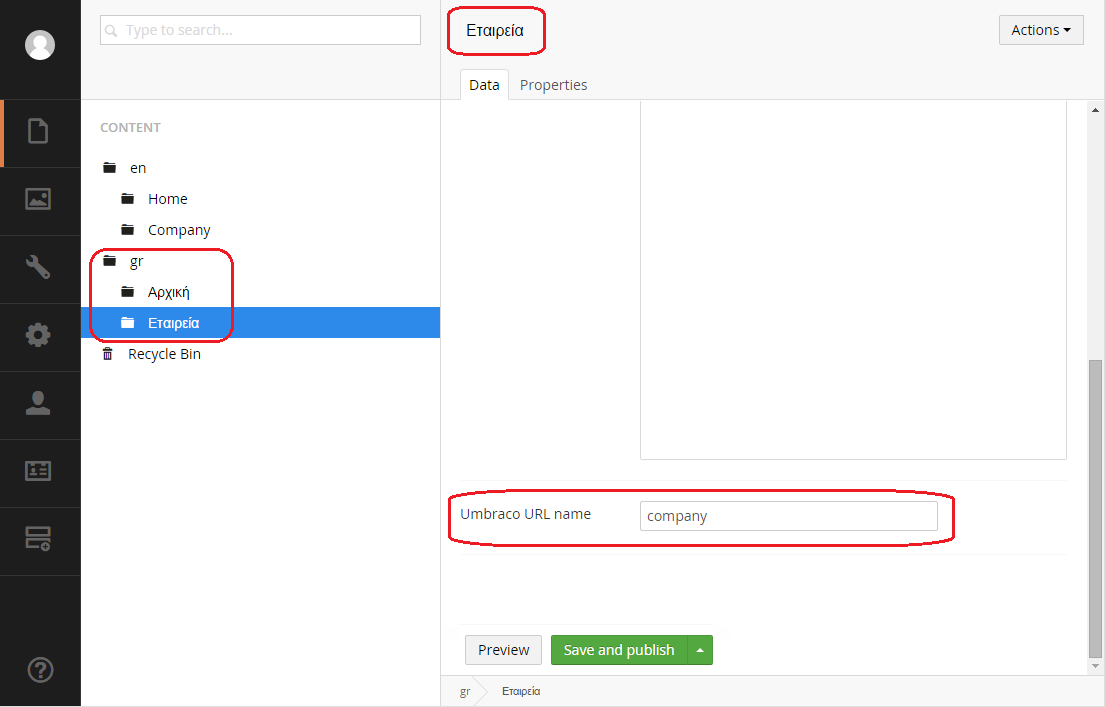
In order to achieve it we will enable a hidden Umbraco property for the document type. We open the Page Document type and we add a new property which has to have the alias name umbracoUrlName and we add it in the Data tab.

We can use this property to define the URL name that Umbraco will use and we can type whatever we want in the page name.
Now we have to go to the Home page of the Greek and English pages and type the value home to the new property and we also have to go to the Company page of the Greek and English pages and type the value company. We also change the name of the Greek pages so that we will have the equivalent Greek texts.
Now we can see that everything is as it is supposed to be and we can try to view the page and the menu works in both languages.
